If you’re upgrading your facility or moving to a new facility, it is highly likely you’ll also be purchasing some logos and letters or some type of new outdoor signage for your building.
Business signs are often done using 3D lettering, also known as dimensional lettering, and there are several options available for your use.

If You Need to Purchase Logos and Letters for Your Business Signage, Make Sure They Have a Lifetime Warranty
Sign lettering made from cast or cut metal is a great option, but not everyone has the budget to afford them. Metal exterior graphics come in several types of metal, such as aluminum, bronze, stainless steel, brass, or copper. However, with there are some other options. These types may be less expensive, but usually are used in conjunction with LED lighting, so the cost is probably even higher than cast metal lettering and logos.
Another option for would be laminated letters, typically made with an outdoor foam with a metal or plastic laminated to the top of the foam, with the edges painted. The edge paint can be either matching or contrasting. Those made from this material will typically last up to 10 years which is OK if you don’t think you’ll stay in the building more than that amount of time.
Another type is the high density urethane foam. This material is dimensionally quite stable, although if these are too near the ground and are bumped or have contact with anyone or anything, the bumped spot will tend to “shed” paint. Otherwise, these are an OK option, but in my opinion, the cost is too high when there are other less expensive and superior options.
Formed Plastic Business Sign Letters – It Just Makes Good Sense
Molded plastic lettering signs are often quite cost effective, and if purchased from a reputable company will always carry a limited lifetime warranty. The limitation is that the letters can’t be moved. However, we’ve found that even with the limitation, they are often no more costly than laminated options, and are almost always less costly than metal or HDU products.

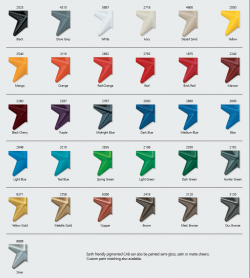
There are both molded in plastic colors available, and if you have specific colors specified for your company, they can also be painted with a urethane enamel and still have a lifetime warranty, if they come from a reputable manufacturer or distributor. The ones that we distribute are made from cellulose acetate butyl plastic, or CAB for short. These are weather durable and color fast.
Placing and Installation on a Wall – Different Ways to Get to the Same Place
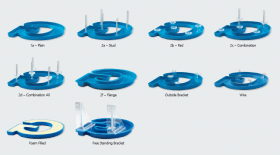
Mounting is done in one of 5 different ways. Mounting patterns can be purchased for placement with the letters.
1) If they are specified with a flange, they can be glued to a wall with silicone or they can be screwed to some types of walls with pan-head style stainless steel screws, available at most hardware stores.

2) Method #2 is just plain stud mounting your formed plastic signage. This method works well for flush mounting lettering, but can also be used to set the graphics off the wall as well if a spacer is used. Using your pre-made mounting pattern, holes are drilled in the wall. Silicone glue is squirted into the holes and also on the studs themselves, then the studs are inserted into the holes. The advantage to studs is that they hold them in place while the glue is drying.
3) The third method for installing is known as “pad mounting,” and consists of a plastic disc and threaded metal “studs” that are threaded into special mounting blocks affixed to the backs of your formed letters. A small amount of silicone glue is squirted onto the mounting pads, and then placed on the wall and taped in place using a painter’s masking tape or similar. This works well on interior or smooth exterior walls.
4) Method #4 is the combination mounting method, where studs are used on the top of the exterior sign (typically), and pads on the bottom. This is actually my favorite method, as drilling the holes exactly using a pattern can be somewhat difficult in many exterior walls. It allows a certain amount of movement that is not available if there are 3 or more studs on the back of the plastic letter you’re mounting to the wall. I use tape to move the each piece to the right location and hold it there.
5) The fifth main method for installing is the stud/pad combination. This is a pad that has the thread running all the way through it to allow the glue to be primarily on the pad, but so the stud can hold it in place. In reality, when I do the installation, I might use a combination of studs, pads, and stud/pad combinations to make the installation proceed as smoothly as possible.
There are also some miscellaneous mounting methods that are not used as much, such as the flat surface mounting bracket and the foam filled formed plastic letters and logos, but one way or the other, we can help you get your new business sign installed – with that all important lifetime warranty!
Check here, https://www.visigraph.com/signs-letters/formed-molded-plastic-letters-logos/, to see more of lettering graphics.
If you have anything more to add, feel free to share your tips in the comment form at the bottom of this page.
Popular Posts:


